Fun Print-Ready Doodled Business Card Design (20 Steps)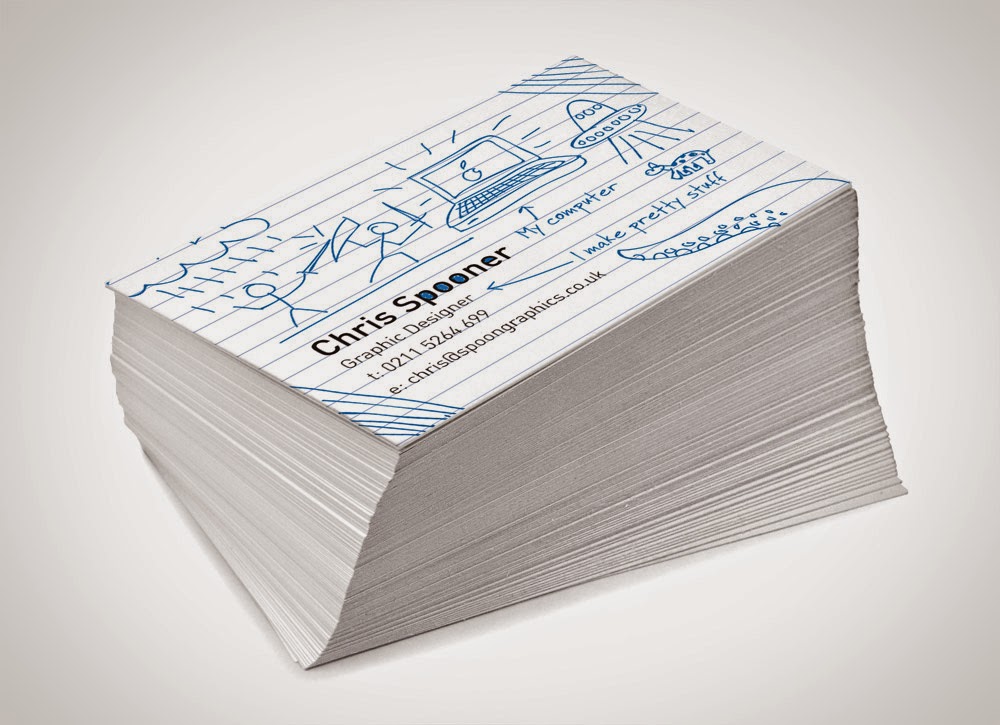
To Design a Business card like this, follow the given steps :
Step 1
Start work by opening up Adobe Illustrator or you can design this in Photoshop too.
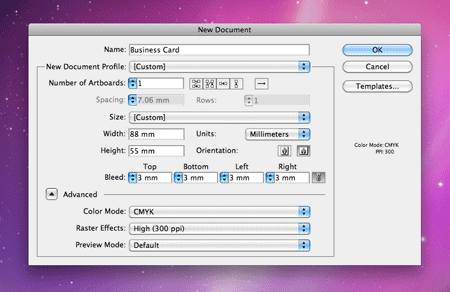
The business card size I’m familiar with is 88x55mm, but this may vary depending on your printer of choice. Enter 3mm into the Bleed options to allow Illustrator to set up your document. Also remember to ensure you’re using the CMYK colour mode for print. It’s also worth noting that folks from the USA will more than likely want to switch to the more common metrics of inches, as opposed to Millimeters.
Step 2
Illustrator has kindly positioned a red guide to let you know where your bleed boundaries are, as well as the black outline showing where the final card boundaries will be. You’ll also want to add your own ‘safe margin’, so that none of the important elements of your design appear too close to the edge. Drag four guides onto the art board and line them up with the document boundaries.

Step 3
Right click and unlock the guides. Select the left and bottom guides and hit enter. Input 5mm into the Horizontal and Vertical options then press OK. This will move the guides 5mm into the document, leaving a margin to work towards.

Step 4
Repeat the process for the top and right guides, but this time enter -5mm so they are moved negatively. Right click and lock the guides to avoid accidentally adjusting them.

Step 5
A typical background you might find behind a doodle would be the ruled pattern from a notepad. We’ll recreate that pattern recreate a similar lined background to our business card. Draw a square with a white fill, then select the upper most edge with the Direct Selection tool. Press CMD+C to copy and CMD+F to paste in place, then move the path downwards towards the center of the square. Add a blue stroke at 0.5pt with the colour c35,m20,y0,k0.

Step 6
Select the two objects and group together, then drag them into the swatches palette to create a new pattern swatch. This swatch will repeat when it’s added as a fill.

Step 7
Draw a rectangle onto the art board and align it exactly with the bleed margins. Add the pattern swatch as its fill color.

Step 8
No business card would be complete without contact details, so we’ll add these first. Type out your name in your favorite font (mine is DIN). Align the text up with both the ruled background pattern and the left guide that identifies the safe-area.

Step 9
Finish off entering your contact details and adjust the line-height to match the height of the ruled lines. You might want to use a variation of type sizes, but remember to avoid point sizes less than 6 to maintain legibility on the printed card.

Step 10
Now let’s get creative and decorate this boring business card! Use the Paintbrush tool and select a small round brush from the Brushes palette. Choose a typical ink-like color such as c45,m35,y0,k0 for the stroke color and begin doodling on your card design. Make sure any sketch lines that extend beyond the edges of the card also span across the bleed area.

Step 11
There are no rules when it comes to doodling. Draw whatever comes to mind, for me it was a stick-man battle scene.

Step 12
Don’t worry if your lines aren't overly accurate, it’s only a quick and fun doodle after all. Just remember to extend your lines beyond the bleed edges.

Step 13
Fill up any empty space with a random doodle, soon you’ll be left with the coolest business card design on the planet.
 Step 14
Press CMD+A to select all your objects, then go to Object > Expand Appearance. This will convert all those strokes into solid shapes.

Step 15
Draw a temporary rectangle that fits into the bleed area. Leave the rectangle without a fill or stroke. Select all the doodle lines that extend beyond the edges of the bleed area along with the temporary rectangle. Click the Crop option from within the Pathfinder palette.

Step 16
All the elements should now have been clipped down to size and fit neatly within the business card bleed dimensions.

Step 17
Select all your text elements then go to Type > Create Outlines. Just like the Expand Appearance menu converted strokes to shapes, Create Outlines converts text to solid shapes, this will prevent any font related issues with your print file.

Step 18
Go to File > Print to bring up the print options. Select Adobe PDF from the Print drop down, select Custom for the Media Size, then select the Marks and Bleed option and add all printer’s marks.

Step 19
Illustrator will then export a print ready PDF file that’s ready to send off to your printer of choice.

Step 20
Press CMD+A to select all your objects, then go to Object > Expand Appearance. This will convert all those strokes into solid shapes.
Before sending off your file, you might want to double check your ink coverage and number of plates your design will use. In Adobe Acrobat Pro, go to Advanced > Print Production > Output Preview. In the following options panel you can toggle each of the CMYK plates to ensure your colours have exported as expected. Your text and linework will look their best with just one or two colour plates being used. The more plates a colour swatch uses, the higher the risk of mis-registration and blurred lines. In the screenshot notice how all the doodles use the Cyan plate, but the text is invisible, this is because the text only uses the Black (K) plate.

A few days later your freshly printed cards will be in your hands and you’ll be the coolest designer on the planet.

Tutorial Found on :
http://blog.spoongraphics.co.uk/tutorials/create-a-fun-print-ready-doodled-business-card-design


0 comments:
Post a Comment